Configure a New Alert Profile
This guide provides instructions for creating a profile and setting up basic alerts. Please be aware that it does not cover advanced configurations and customizations that organizations may frequently require.
You have the option to either create a new profile or modify an existing one. In both cases, the New/Edit Profile dialog window will open. To create a new profile, click the [+ Profile] button in the top right corner of the screen, which will launch the New Profile dialog window. Both options feature configuration screens for Details, Resources, Alerts, and Notifications with differences depending on whether a new profile is being created or cloned, or if an existing profile is being edited.
Details
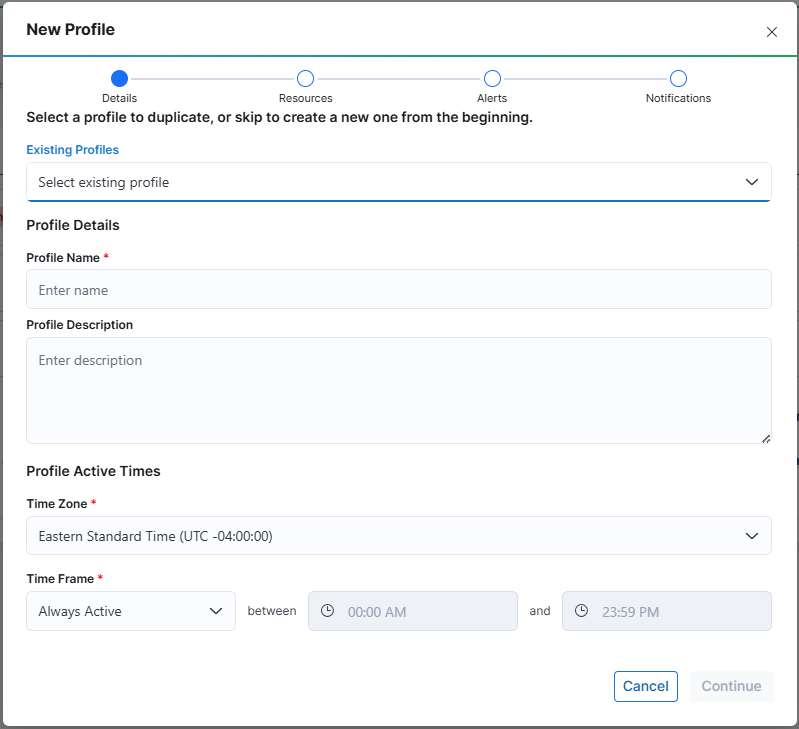
Once you select to create a new profile, you will first decide whether to clone an existing profile or create a new profile.
Clone a Profile
Cloning a profile allows you to copy the details from the selected profile, appending the name with - Copy. You should modify this name to ensure it is unique within your account for it to be saved. Additionally, feel free to edit the description and update the Profile Active Times section as needed. Once you have made your changes, click the [Continue] button to proceed to the next page, Resources.
Create a New Profile
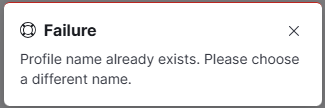
To create a new profile, you must provide a unique name. If the name is not unique within your account, an error message will appear in the lower right corner of the screen, as shown below:
In the Description field, you can provide a detailed explanation of the profile and any specific use cases. Adding comprehensive details will help others understand the intended purpose of the profile.
Next, select the time zone for the profile. The drop-down selector will default to your browser's time zone. Then, choose the Time Frame for the profile. The default option is Always Active, but you can also select Weekends or Weekdays. If you choose Always Active, you will not be able to specify a time range. However, if you select Weekends or Weekdays, you must define the start and end times for the profile.
Once you have completed all the required fields, click the [Continue] button to move on to the next screen, Resources.
Resources
On the Resources page, you will choose which resource(s) to assign to your new profile.
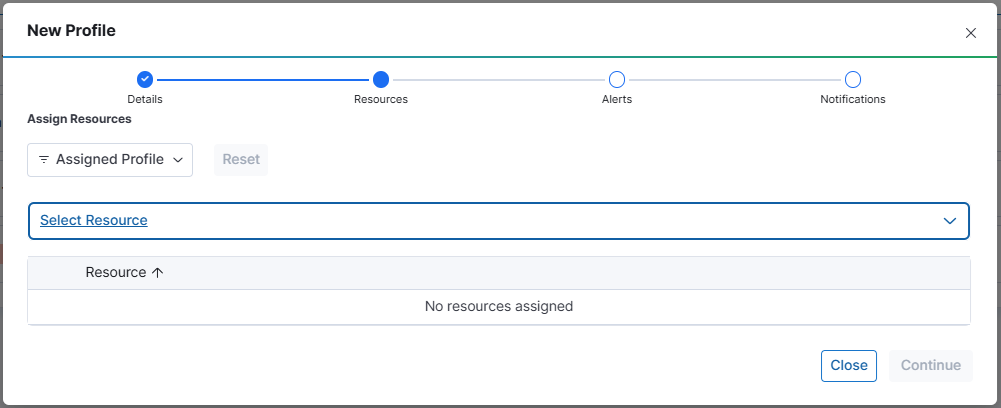
A resource can only be assigned to one profile at a time, with the exception of the System Alerts profile, which includes all monitored resources.
The Resources page features an Assigned Profile filter with two options:
- Assigned: Displays all resources that are already assigned to a profile.
- Not Assigned: Displays all resources that are not currently assigned to any profile.
If no filter is selected, all resources in WISdom will be displayed.
Use the [Select Resource] drop-down menu to view all available resources based on your selected filter. You can search for specific resources or use the "Select All" option. Selected resources will be marked with a blue check box next to their names. Once you have made your selections, click [Apply]. The chosen resources will then be displayed in a table. Unchecking a resource will remove it from the list.
Saving Resource Configurations
After selecting all desired resources, click [Continue] to apply them to the profile.
Please note that if you close the profile window or navigate to another screen before saving the selections, they will be lost and not applied to the profile.
Once the data has been saved, either click [Next] in the bottom left corner or select the Alerts dot on the navigational bar of the dialogue window.
Alerts
The Alerts screen alllows you to select the Alerts the profile will contain.
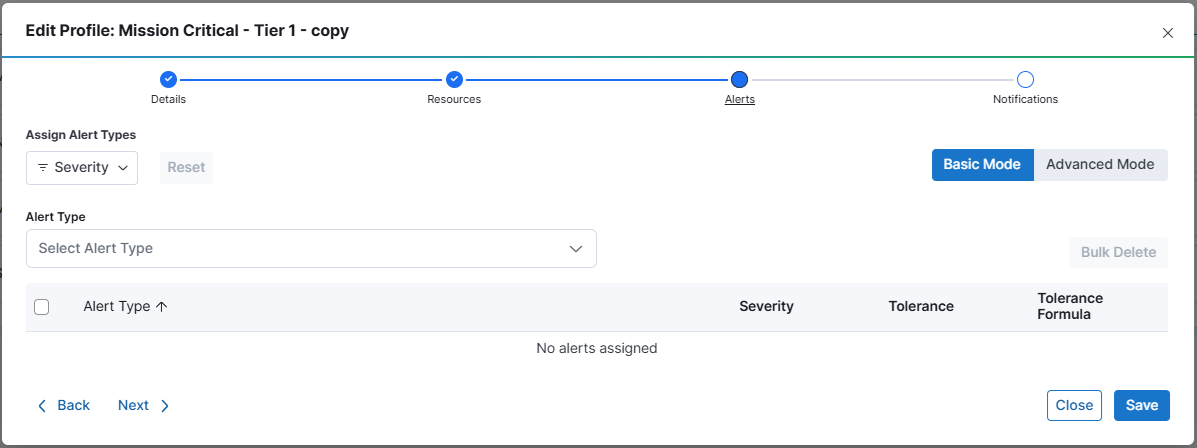
The Alerts screen has a filter, [Severity], allowing the alerts displayed in the Select Alert Type drop-down selector to be filtered by the select Severity filter.
There are two modes for the alert configuration, Basic and Advanced.
Basic Mode
Basic Mode is only available when none of the alerts associated with the profile have an Advanced configuration.
In Basic Mode, you can filter alerts by severity. To view the available alerts, select the [Select Alert Type] drop-down menu. You can also use the search bar to find alerts by name or keyword. Choose the alerts you want to assign to the profile; each selected alert will be marked with a blue checkbox next to its name. Click [Apply] to add the selected alerts, which will then appear in the Alert Types table.
Next, configure the severity for each alert. You can choose from Informational, Warning, or Critical. The selected severity will determine which Notification Channel is used when the alert is triggered, both for the OPEN alert and the CLOSED alert.
Then, set the tolerance (thresholds) using the provided drop-down menus. The default options are Low, Medium, or High. If a custom tolerance has been defined in the Alert Types screen by editing an alert, additional tolerance settings may be available.
The Tolerance Formula column features a clickable icon that will display the tolerance formula for easy reference. The checkboxes next to each alert name in the Alert Types table allow you to select multiple alerts for bulk deletion. Once you have selected the alerts, the [Bulk Delete] button will become active.
After selecting and configuring the alerts, be sure to click [Save] to apply them to the profile. If you navigate away from the page without saving, your selections will be lost.
Advanced Mode
If any alerts associated with the profile have been configured for Advanced settings, the Alerts screen will only display in the Advanced mode, and Basic mode will not be accessible.
Advanced Mode allows for the configuration of escalation levels for alerts. In this mode, each alert is displayed with a parent row, and each escalation level is shown on its own numbered row, starting with 1 for the original alert tolerance settings. The number of tolerance settings determines how many escalation levels are available for an alert, with a default of three levels. Each added escalation level must have a lower tolerance setting than the previous one, with options for standard tolerances (Low, Medium, High) or custom settings as defined in the Alert Types screen.
To add an escalation level to an alert, click the three vertical dots at the end of the row for the selected alert. This action button provides three options:
- View Alert Type: Displays the Alert Type Details flyout for viewing. This is the same flyout shown in the Alert Types screen, but editing is not permitted.
- Add Level: Adds a new escalation level to the alert. This option will be unavailable if a lower tolerance setting is not available.
- Delete Alert: Deletes the selected alert along with all configured escalation levels.
Note that there is a trashcan icon at the end of all escalation level rows. Only the highest escalation level can be deleted individually, as indicated by the trashcan icon only being active for the highest level. For example, to delete escalation level 2 from an alert with three levels, you must first delete level 3 and then reconfigure level 2 accordingly.
Notifications will be sent based on the severity assigned to each level. While the same severity can be used across levels, it is recommended to assign higher severities for notifications sent through various channels defined in the Notifications section of the Profile Editor.
For some alerts, there will be an Object drop-down selector, allowing the alert to be defined to run only against specific objects. For alerts with this drop-down available, click it to display all objects related to the resources selected for the profile. For example, with the alert SQL Server Agent Job Failed, the object drop-down may show all jobs on the selected resources. You can select one or more jobs explicitly, so the alert will only apply to those specified jobs. There is also an [Add Object] button at the bottom of the pop-up, which allows you to create names with wildcards (e.g., "Backup%") for dynamic matching. This means the alert will evaluate any job with a name starting with "Backup," and any future jobs added to the resources with names beginning with "Backup" will automatically be included in the profile for alerting.
Saving Alert Configurations
Be sure to click [Save] to apply the alerts to the profile before navigating away from the screen to avoid losing your selections. Once the data has been saved, you can either click [Next] in the bottom left corner or select the Alerts dot on the navigation bar of the dialog window.
Notifications
In this section, you can define the alerting channels that will receive notifications based on the severity settings of an alert. Notifications are available for both Open and Closed events.
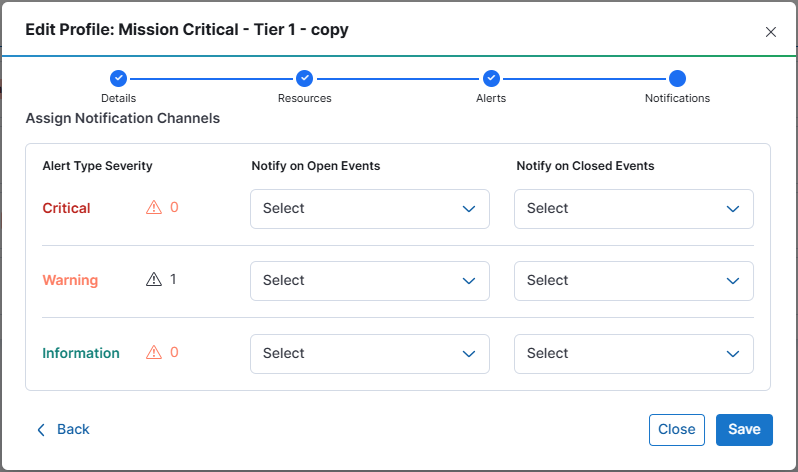
Use the drop-down selectors to choose from any of the configured Notification Channels. You can select multiple channels or none at all for each severity level for both Open and Closed events.
The Notify on Open and Closed events feature allows for automatic communication when an alert is resolved. If a ticketing system is configured as a notification channel and set to receive both open and closed alerts, it can be programmed to automatically close the open ticket when the closed alert is received. This creates a more efficient and automated way to communicate that an issue has been resolved, whether through manual intervention or automatic correction.
Assign notification channels for alerts according to their severity, and configure notifications to be sent for open or closed events.
Saving Notifications Configurations
Be sure to click [Save] at each step to commit your changes. You can click [Close] to exit the wizard while retaining any saved changes.
- Alerts can be tailored with various severities, tolerances, alert rules, and escalation levels to meet specific needs.
- Custom tolerances can be established in the Alert Types screen and applied during the profile configuration process.
- Alert exceptions can be defined using an Alert Rule, allowing multiple rules to be assigned to a single alert for more granular control.
- Ensure that notification channels are appropriately assigned based on the severity of alerts to facilitate effective communication.
- Remember to save your configurations at each step to avoid losing any changes made during the setup process.