The Team screen provides information related to all WISdom users for the account.
Managing Existing Accounts
The page displays a table of all Team Members added to the account. The title bar above the table shows the total number of Team Members.
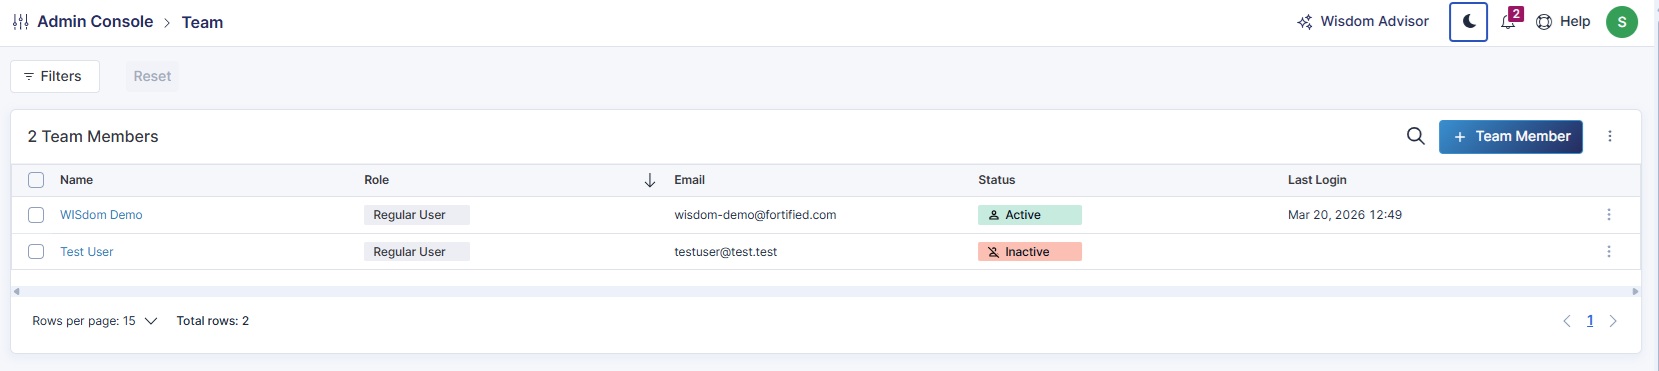
The table contains the following columns:
- Name — The Team Member's name.
- Role — The user role assigned to that Team Member. See User Roles below for details.
- Email — The email address associated with the Team Member's account.
- Status — The current status of the Team Member: Active or Inactive. An inactive account cannot log in to WISdom.
- Last Login — The date and time of the Team Member's last successful login. This field is blank for users who have not yet activated their account.
All columns are sortable by clicking the column header. Use the search icon to search by name or email. Use the Filters button to filter the list by Role or Status.
Note: The filter panel currently labels the Role filter as Profile. This is a known issue and will be corrected in a future release.
Managing a Team Member
Click the three vertical dots at the end of any row to access account management options.
Edit
Opens the Edit Team Member flyout, where the Team Member's First Name, Last Name, Email, and Phone can be updated.
Note that the Phone is only displayed in the Edit User flyout and not used elsewhere in WISdom.
Deactivate (Active accounts only)
Sets the Team Member's status to Inactive, preventing them from logging in to WISdom. The account is not deleted and can be reactivated at any time.
Tip: Deactivating and then reactivating an account will reset the user's credentials and force them to set up a new MFA method. This process can be used to help a user who has gotten a new phone and needs to re-enroll their authenticator app.
Activate (Inactive accounts only)
Reactivates the Team Member's account. When an account is activated, an invitation email is sent to the account's email address with a link to set up credentials and MFA. The link is valid for 7 days.
Note: Activating an inactive account will reset the user's credentials, even if it was an active account in the past. The user will be required to create a new password and configure a new MFA method.
Delete
Removes the Team Member from the Team page and deactivates the account. The account record is retained in the system. If a new account is created using the same email address, an error will indicate that the account already exists. Contact WISdomSupport@fortified.com to have a deleted account reactivated.
User Roles
WISdom uses role-based access to control what each Team Member can see and do within the platform. The available roles are:
- Administrator — Full administrative access to all WISdom functions.
- Power User — Full read access across the platform, plus limited administration abilities, such as managing Tags and Alerts.
- Regular User — Read-only access to WISdom.
- MSP Administrator — Administrator access over all child accounts. Available on Managed Service Provider (MSP) accounts only.
Note: Not all roles are available for all account types. MSP Administrator is only available on MSP accounts, and MSP parent accounts only allow MSP Administrators as a role.
Adding a New Account
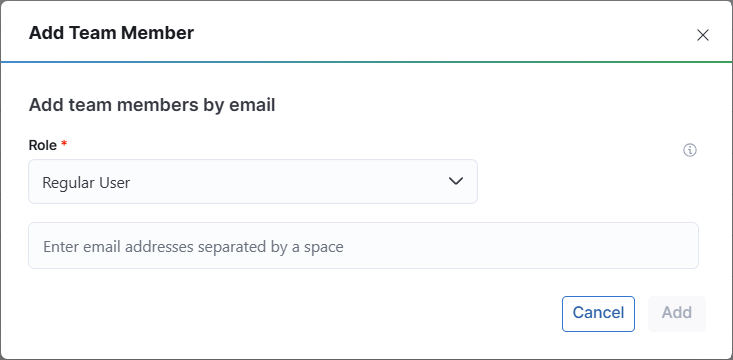
To add a new Team Member, click the blue + Team Member button in the upper right corner of the screen. A pop-up will appear where the new account information is entered.
Select the user's Role and enter their email address. Multiple users may be added at the same time by separating the email addresses with a space; they will all be assigned to the selected Role. Once the required fields are populated, the Add button becomes active.
Click Add to create the account. The following actions occur:
- The user account(s) is created in WISdom.
- For non-SSO accounts, the credentials are created in Auth0.
- An email is sent to the provided address.
- For a non-SSO account, an invitation email is sent with a link to create the password and complete the account setup.
- For an SSO account, an email is sent with the WISdom URL, https://app.fortifiedwisdom.com/login, letting them know their account has been created in WISdom and they may now log in with their network credentials.
- A confirmation message appears in the bottom right corner, indicating success or displaying an error if one is encountered.
- The new Team Member appears in the table with a Status of Active and a blank Last Login field until the user completes account setup.
Account Setup (Non-SSO Accounts)
For accounts that do not use Single Sign-On (SSO), the invitation email contains a link to complete account setup. The user must:
- Click the link in the invitation email to access the credential setup page.
- Create a password for their account.
- Configure a multi-factor authentication (MFA) method.
- Once the MFA setup is complete, the user is redirected to the WISdom homepage and can log in with their credentials.
Important: The invitation link is valid for 7 days. If the link expires before the user completes setup, an Administrator can deactivate and then reactivate the account to generate a new invitation email.
For SSO-enabled accounts, users authenticate through their organization's identity provider and do not receive an Auth0 invitation email.