All alerting within WISdom is associated with Profiles. A profile is a group of Resources that may have various Alerts and Notifications attached. A resource can only be a member of a single Profile. New installations will have two incomplete "template" profiles. These can be edited as desired by the user.
- Use the drop-down menus to further filter the list by Instance and/or Alert Type.
Profiles
This card displays the available profiles with the following information:
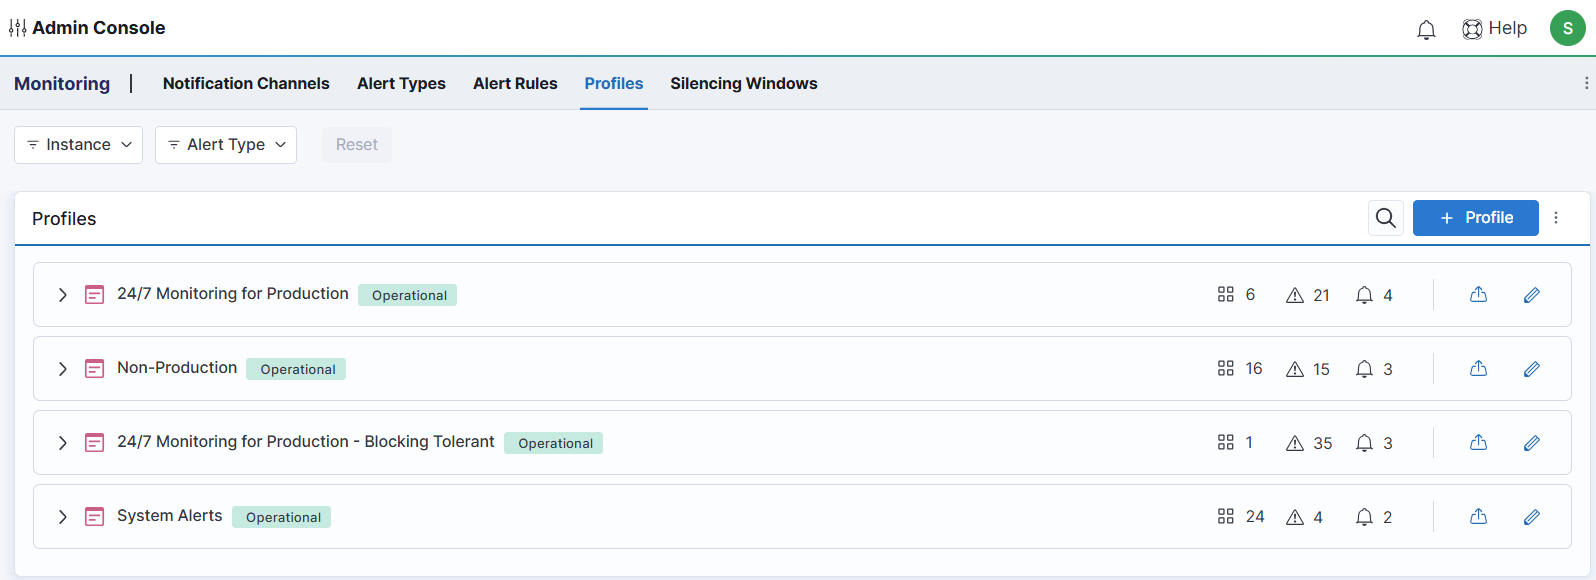
- Profile Name with Icons and Counts for resources, alerts, and notification channels associated with that profile.
- Click on the number to see/export the associated items in tabular format.
- Export to Excel Button
- Edit Button (Pencil)
- Expand using [>] button to see Profile Name, Description, Active Time Zone, and Active Time Frame.
- This card supports creation of new profiles using the [+ Profile] button in the top-right corner.
- All Profiles can additionally be exported as JSON using the action icon in the top-right corner of the card.
Profile Creation/Editing
Editing or creating a new profile will launch the New Profile/Edit Profile pop-up. This is made up of four steps, each of which requires a click of the [Save] button to commit the changes and move to the next screen. Clicking [Close] at any point will exit the pop-up and retain any saved changes.
Details Screen
The Details screen of the pop-up provides the following fields:
- The Profile Name field allows the naming of the profile.
- The Profile Description field is an optional free-text field to attach additional information for the profile.
- The Time Zone field allows selection of the time zone associated with the profile.
- The Time Frame field allows the selection of Always Active or a starting and ending time for alerting to be active on Weekdays or Weekends.
- You can add an additional time frame if Always Active is not selected.
Resources Screen
The Resources screen of the pop-up provides the following fields:
- The Assigned Profile filter allows filtering for resources that are or are not already members of a profile.
- The Select Resource drop-down allows the selection of resources to add to the profile.
- This provides both a search box and a Select All option.
- The Resources table at the bottom shows the currently selected resources.
- Removing the check by the resource name removes the resource from the profile if saved.
Alerts Screen
The Alerts screen of the pop-up provides the following fields:
- The Assign Alert Types drop-down filter allows filtering the alerts by their currently selected severity.
- The Select Alert Type drop-down menu provides a searchable list of all of the alerts in WISdom.
- Check the desired box(es) or Select All to add the alerts to the Profile.
- The Alert Table at the bottom shows all of the alerts associated with the profile and is made up of the following columns:
- The Alert column displays the name of the Alert.
- The Severity column provides a drop-down menu to set the severity level of the alert which will affect its associated Notification Channels on the next screen.
- The Tolerance column provides a drop-down menu to set the Tolerance (thresholds) for the alert.
- This includes any custom tolerances created in the Alert Types screen.
- The Object column provides a drop-down menu where applicable to select the objects to which the alert applies.
- Selecting an object from this list constitutes an explicit selection, meaning only the chosen object(s) will trigger alerts, while all others will be disregarded. Additionally, an Add Object option is now available at the bottom of the list, allowing users to create names with wildcards. For example, if you create the name Backup%, any job starting with "Backup" will trigger the failed job alert, including any new jobs created with that naming convention. Wildcards can be used freely in the naming process.
- The Tolerance Formula column explains how the alert threshold(s) are configured for the selected Tolerance.
Notifications Screen
The Notifications screen of the pop-up provides the ability to select one or more notification channels for each alert Severity category. These channels must have already been configured in Notification Channels. These can be defined to notify both on Open and Close of the events.
- Note that a Severity with no associated notification channel will still monitor Alerts of that severity, but they will only be displayed in the Monitoring > Alerts screen. This is a great way to test configuration before opening tickets, emailing, or paging users.
MSP Notes
For MSP accounts, any profiles defined at your parent account level will be replicated as templates to NEW child accounts. This is not retroactive to previously created accounts. They can be edited as usual at the child account level.